Nuke is one of the most iconic maps in Counter-Strike history, present in the competitive pool as far back as CS 1.6.
While maps like Mirage reward straightforward two-site tactics, Nuke introduces a vertical dimension that fundamentally changes how teams communicate, rotate, and execute strategies.
Understanding all cs2 nuke callouts explained is not optional for players who want to compete seriously on this map.
Without precise positional language, the split-level structure creates confusion that even mechanically skilled players cannot overcome.
Nuke punishes vague communication more than almost any other map in the pool. Teams that master it gain a structural advantage that is difficult to overcome.
All CS2 Nuke Callouts Explained
All CS2 Nuke Callouts Explained
Nuke is unique in the CS2 map pool because it forces teams to think in three dimensions simultaneously. Upper site, lower site, and outside all operate in parallel during live rounds, meaning a single miscommunication can collapse an entire execute or retake before it begins.
- Why Vertical Maps Require Better Communication On a flat map, a rotation is a horizontal movement from one site to another. On Nuke, rotations involve moving between floors — from upper to lower, from ramp to hell, from outside to tunnels. Calling out that an opponent is “on site” means nothing here without specifying whether they are on A Site, B Site, Heaven, or Rafters. The vertical split structure demands a level of callout precision that most other maps do not require.
- Difference Between CS:GO and CS2 Layout The map’s core geometry has carried through from previous iterations with refinements along the way. Players coming from Nuke callouts csgo will find the vocabulary largely intact, but layout tweaks in specific zones — particularly outside and the ramp area — mean some positional habits built in earlier versions may need updating for the current CS2 version.
- How Nuke Differs From Other Maps Compared to Mirage callouts CS2 players commonly use, Nuke’s callout system is significantly more complex due to its verticality. Unlike Inferno callouts CS2 teams rely on for linear bombsite approaches, Nuke requires constant awareness of both floor levels at once. And while Overpass callouts CS2 players know involves a water system and multi-level play, Nuke’s two fully functional bombsites on separate floors create a unique communication burden that no other map in the pool replicates.
- Why Nuke Experts Dominate Premier Map knowledge on Nuke is a genuine competitive differentiator. Players who have invested time learning every position and their names gain rotational awareness and utility execution precision that compounds across every round. In Premier, where the map pool is locked in, teams that can reliably execute on Nuke consistently outperform those who treat it as a secondary study.
| Map Layer | Main Focus | Difficulty Level |
|---|---|---|
| Upper Site | Fast executes & rotations | Medium |
| Outside/Yard | Control & Secret pressure | High |
| Lower Site | Utility usage & tight angles | Very High |
Nuke CS2 Callouts Guide
Learning Nuke efficiently requires a structured approach. Unlike maps where players can develop map knowledge passively through repeated play, Nuke’s multi-level layout means players can spend hundreds of hours on the map and still misidentify positions simply because they have never been forced to call them precisely.
- Start With Outside Control Outside is the connective tissue of Nuke’s map flow. Red, Secret, and Garage are the three most strategically significant positions in this zone. Red provides mid-outside presence and forces CTs to contest from Garage or commit to an early engagement. Secret controls access to B Site via tunnels, and Garage provides long-range sightlines that can shut down entire T-side rotations if held by a competent AWP player. Outside control shapes every round before either bombsite is even threatened.
- Master Upper Before Lower The standard learning path for Nuke begins with Upper Site. The angles, positions, and callout vocabulary on Upper are more forgiving than Lower, which features tighter corridors and close-range encounters that punish players without pre-existing positional knowledge. Building Upper Site fluency first gives players a communication framework they can apply when learning the more complex Lower Site.
- Understand Common Nuke Positions CS2 Players who have spent time studying Nuke positions CS2 professionals use will recognize that certain positions — Heaven, Rafters, Big Box, and Dark — appear in strategic calls far more frequently than others. These are the anchor positions that define site control on both levels and should be the first locations memorized when building positional vocabulary on this map.
- Wingman Differences Nuke callouts wingman usage differs from standard competitive play because the 2v2 format removes several positions from active strategic consideration. Outer positions like Silo and T Roof become less relevant, and play concentrates heavily around Ramp, Secret, and the site entries. Players transitioning between modes should be aware that Wingman Nuke vocabulary is a subset of the full callout system.
- Comparison With Ancient Like Ancient callouts CS2 players study for its enclosed cave and temple system, Nuke rewards players who invest time learning its unique structural vocabulary. Both maps feature positions that do not appear on any other map in the pool, and both punish teams that apply generic callout language borrowed from simpler maps.
| Zone | Key Callouts | Strategic Value |
|---|---|---|
| Lobby Area | Squeaky, Hut, Radio, Trophy | Entry control |
| Ramp Area | Ramp, Hell, Control | Rotation denial |
| Outside | Red, Garage, Secret, Silo | Map dominance |
| Lower | Single, Dark, Double, Window | Post-plant strength |
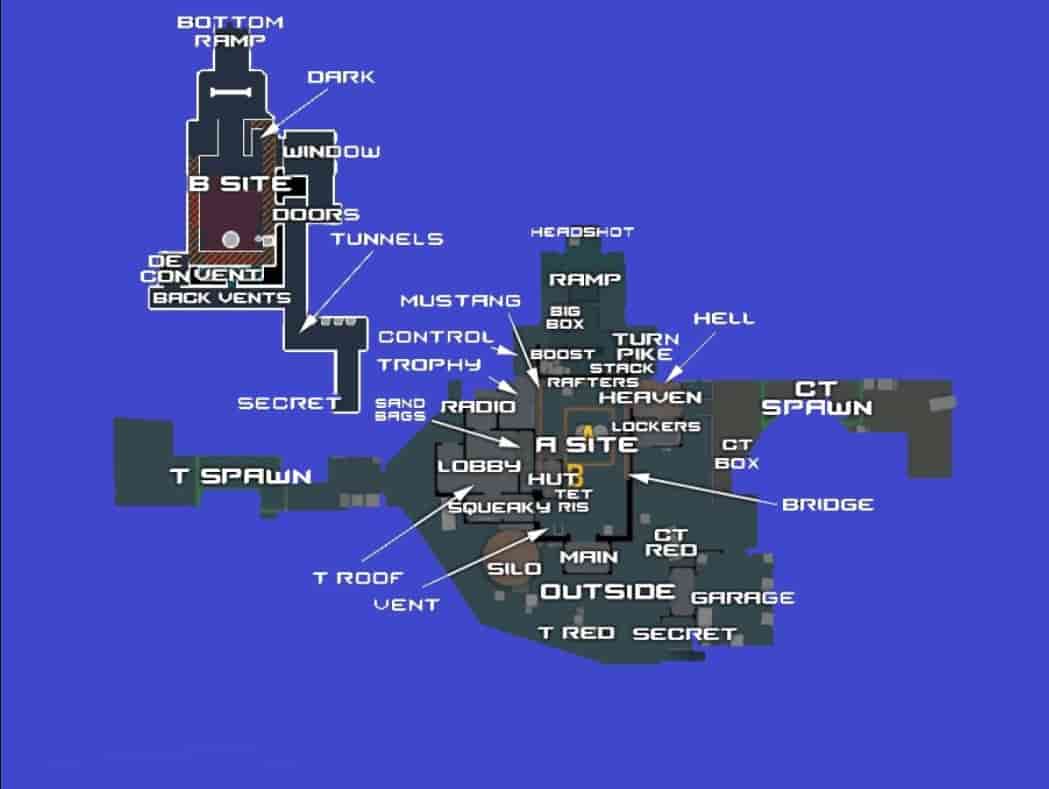
CS2 Nuke Callouts List (2026)
- CT Spawn The area where Counter-Terrorists begin every round. It serves as the central hub for defensive distribution, with players splitting toward A Site, Outside, and Ramp depending on the round’s opening strategy. CT Spawn is referenced constantly in early-round calls and retake coordination.
- T Spawn The starting zone for Terrorists at the beginning of each round. From T Spawn, players can immediately branch toward Lobby, Truck, or T Roof. It is the tactical origin point for every T-side strategy and is referenced when confirming round-start distribution.
- Truck A large truck located to the right as players exit T Spawn. Truck provides early-round cover and is used as a positional reference for players holding the outer area or setting up an off-angle before committing toward Lobby or Outside.
- Lobby The large open indoor area on the T side of the main building. Lobby is the primary staging ground for Ts before distributing to Squeaky, Radio, Trophy, or Hut. It is one of the most called positions on the map because nearly every A-side or Upper execute flows through it.
- T Roof The roof area above Lobby, accessed via ladders inside Lobby and near Truck. T Roof connects Ts to Silo and provides elevated angles over parts of Outside. It is called out when a player is climbing or positioned on the roof during outside-oriented plays.
- Squeaky A small room attached to Lobby featuring a door with a distinctive squeaking sound that leads directly onto A Site. The door noise acts as an audio cue for both teams — CTs will listen for it to anticipate an A push, and Ts must decide whether to use it boldly or smoke it to suppress the sound warning.
- Radio A small room connecting Lobby toward Ramp, positioned adjacent to Trophy. Radio is used as a positional callout when a player is in transit between Lobby and the Ramp area. It features in calls about early-round movement and mid-round rotations toward Upper Site.
- Trophy A small room adjoining Radio that leads further toward Ramp. Trophy is referenced as a depth marker — indicating a player has moved beyond Radio and is committing toward the Control corridor. It is part of the sequential positional language used for tracking movement through the building interior.
- Control A short corridor beyond Trophy that connects directly to Ramp. Control is a critical chokepoint where CTs can set up early aggressive positions or Ts can use utility to open a safe push into the Ramp area. Calling “player in Control” warns teammates that the T-side advance is imminent.
- Boost Stacked boxes to the right of the Control entrance that allow players to boost up to a surprise elevation. Players boosted here gain unexpected sightlines into Control and can catch Ts completely off-guard during an advance. It is called out immediately when a teammate takes the position.
- Ninja A tight cubby positioned underneath the Boost boxes. Ninja is one of the map’s hidden defensive positions and is used for late-round plays, post-plant holds, or catching opponents who are not checking low angles. It is referenced in clutch scenarios and anchor setups.
- Ramp The central large ramp area that connects Upper Site to Hell and B Site below. Ramp is one of the most strategically significant zones on the entire map — controlling it dictates whether CTs can freely rotate between floors. It is called out dozens of times in a typical match.
- Big Box A large box at the top of Ramp providing a direct sightline into the Control area. Big Box is a standard CT-side holding position and is referenced when a player is covering the Control entrance or being spotted holding that angle by a pushing T.
- Headshot A large box at the very back of Ramp with sightlines covering both Control and Trophy. The callout name reflects the exposed head position of players peeking around it. It is used to identify players holding deep angles at the back of Ramp during tactical calls.
- Hell A small room located directly underneath Heaven on Upper Site. Hell is a transitional space between Ramp and B Site, and players in Hell are exposed to angles from Ramp above and B Site below. Calling “player in Hell” signals an imminent Lower Site commitment.
- Lockers A small room adjacent to Hell featuring windows that look out toward the Outside area. Lockers is used as a positional callout when a player is holding or peeking the Outside through its windows, providing information without fully committing to the exterior.
- CT Box A small box just outside CT Spawn used for cover in early-round defensive setups. CT Box is referenced when a player is holding an aggressive early angle from spawn or retreating behind it during a site retake approach.
- Heaven The upper tucked-in area of A Site positioned above Hell. Heaven is one of the most defensively powerful positions on the map because it overlooks the main A Site planting area and provides difficult angles for attacking teams to clear. It is referenced in nearly every A Site hold and retake call.
- Rafters (A Site) The rafter structures on the upper section of A Site, which can refer to any of the three rafter positions around the site. Rafters provide elevation and concealment and are used in defensive anchoring, post-plant holds, and surprise positioning during CT-side rounds.
- Hut A small hut in Lobby that connects directly onto A Site, providing an alternative entry point alongside Squeaky. Hut is used in fast A-side pushes and is referenced when a player is taking up position just outside the site or using the hut as cover during an execute.
- A Site The main plantable area on the upper level of Nuke. A Site features multiple elevated positions including Heaven, Rafters, Tetris, and Vent that create a complex defensive grid. It is the primary bomb objective on the upper floor and is referenced constantly in site takes and retakes.
- Tetris Two boxes — one large and one small — positioned next to Hut on A Site. Tetris provides plant cover and is a standard reference in post-plant positioning calls. Players calling “plant at Tetris” or “holding Tetris” are communicating both planting intention and defensive anchor choice.
- Vent The vent closest to Squeaky on A Site that can be broken by gunfire to create a passageway down to B Site. Vent is a high-value position because it enables vertical rotations between floors without using Ramp. Breaking Vent is frequently called to signal a planned B Site commitment.
- 2nd Vent The second vent on A Site, located furthest from Squeaky. Unlike the first Vent, 2nd Vent cannot be broken and does not provide a passageway. It is referenced as a positional marker near the Main hut exit and helps distinguish exact player locations in the Vent area of A Site.
- Main A small hut positioned between Vent and 2nd Vent on A Site that has a direct exit to Outside. Main serves as a transition point for players moving between the inside of the building and the exterior yard area. Calls from Main often precede Outside-oriented flanks or rotations.
- Blue Box A large blue-colored box located along the side of the main building in the Outside area. Blue Box is a navigational and positional reference in Outside calls, helping teammates track exact player positions in a zone with multiple cover elements spread across an open area.
- Outside The main open exterior area of Nuke connecting multiple key positions including Red, Garage, Secret, Silo, and Yard Boxes. Controlling Outside is considered a prerequisite for consistent B Site access and is the zone most contested in the early phase of almost every round.
- Garage A large garage structure at the far CT-side end of Outside. Garage provides direct sightlines to Yard Boxes and controls long-range engagements across the exterior. CT-side AWP holders in Garage can neutralize entire T-side pushes through Outside before they ever reach Secret.
- Secret A staircase leading down from Outside to the B Site level via Tunnels. Secret is the primary access route for B-side executes and is one of the most called positions on the map. Controlling Secret on the CT side denies the T team its most reliable path to B Site.
- Red A red-colored box positioned in the middle of the Outside area. Red is a critical early-round reference point — players at Red are exposed to angles from Garage but gain mid-outside presence that applies pressure to CT-side positioning and rotations.
- Yard Boxes Various boxes clustered beneath the Silo structure in Outside. Yard Boxes provide cover during Outside traversal and are referenced when players are navigating through the exterior or holding angles against pushes from Secret and Garage directions.
- Silo The large silo structure in Outside accessible from T Roof. Silo is a high-elevation position that provides angles across the exterior and is referenced in calls about T-side players taking elevated control in Outside. It is a less commonly used position but impactful when it appears.
- Tunnels A set of corridors connecting Secret to B Site. Tunnels is the primary pathway between the Outside approach and the Lower Site. Players moving through Tunnels are committed to B Site and calls from this location signal an imminent lower execute.
- Back Vents A corridor that connects Vents or Secret to Single. Back Vents is referenced as a transitional callout for players navigating between the lower exterior approach and the Single door entry to B Site, and is important in tracking B-side rotation timing.
- Vents The interior of the Vent system accessed from A Site. Vents is referenced when a player is actively inside the vent structure moving between upper and lower floors. Hearing “player in Vents” signals a cross-floor rotation that the opposing team must account for immediately.
- Single A room with a single door leading directly onto B Site. Single is one of B Site’s primary entry angles and is frequently called during execute setups to confirm how many players are committed to this entry versus the Double door entry on the opposite side.
- Rafters (B Site) The rafters on the upper section of B Site, which can refer to any of the three rafter positions surrounding the lower site. B Site Rafters provide elevation for defenders and are referenced in post-plant holds, anchor setups, and surprise positions used during T-side retakes.
- B Site The main plantable area on the lower floor of Nuke. B Site is accessed via Tunnels, Single, Double, and the Vent passageway from above. Its enclosed geometry and multiple entry angles make it one of the most tactically complex bombsites in the entire CS2 map pool.
- Double A set of double doors on B Site providing an alternative entry from the lower corridor. Double is referenced in execute calls to distinguish entry distribution — players entering from Single versus Double create crossfire angles that defenders must manage simultaneously.
- Window A double window overlooking B Site from an elevated position. Window provides a one-way information advantage, with players able to spot and shoot opponents on site while remaining partially covered. It is a valued defensive position and is called out when a player is holding or being held by it.
- Dark A small tight cubby tucked into the corner of B Site. Dark is one of the highest-value close-angle positions on the map for post-plant defense and is frequently used in clutch scenarios. Players in Dark are nearly invisible to attackers until they are at point-blank range.
- Bottom Ramp The lowest section of the main Ramp leading down toward B Site. Bottom Ramp is referenced to distinguish players at the very base of Ramp from those higher up near Hell or Big Box. It is called out during rotations and retakes when precise floor-level positioning is critical.
| Callout | Area Type | Primary Role |
|---|---|---|
| CT Spawn | Spawn Zone | Defensive distribution |
| T Spawn | Spawn Zone | Round-start positioning |
| Truck | Cover Object | Early exterior cover |
| Lobby | Entry Zone | T control staging |
| T Roof | Elevated Route | Silo & outside access |
| Squeaky | Entry Door | A Site direct access |
| Radio | Transition Room | Lobby to Ramp path |
| Trophy | Transition Room | Ramp depth marker |
| Control | Chokepoint | Ramp entry corridor |
| Boost | Elevated Position | Surprise Control angle |
| Ninja | Hidden Cubby | Post-plant & clutch hold |
| Ramp | Connector | Upper to Lower rotation |
| Big Box | Cover Object | Control sightline hold |
| Headshot | Cover Object | Deep Ramp angle |
| Hell | Transition Room | Ramp to Lower route |
| Lockers | Window Room | Outside information |
| CT Box | Cover Object | CT spawn early defense |
| Heaven | Elevated Position | Defensive anchor |
| Rafters (A Site) | Elevated Structure | A Site anchor positions |
| Hut | Entry Route | A Site alternative access |
| A Site | Bombsite | Primary objective |
| Tetris | Box Cluster | Plant cover & anchor |
| Vent | Passageway | Vertical floor rotation |
| 2nd Vent | Positional Marker | A Site location reference |
| Main | Transition Hut | Inside to Outside access |
| Blue Box | Cover Object | Outside position marker |
| Outside | Open Control Area | Map dominance |
| Garage | Defensive Structure | Outside AWP anchor |
| Secret | Transition Path | Lower split execution |
| Red | Cover Object | Mid-Outside presence |
| Yard Boxes | Cover Cluster | Outside traversal cover |
| Silo | Elevated Structure | Outside elevation control |
| Tunnels | Corridor | B Site approach route |
| Back Vents | Connector Corridor | Secret to Single path |
| Vents | Passageway Interior | Cross-floor rotation |
| Single | Entry Route | B Site single-door entry |
| Rafters (B Site) | Elevated Structure | B Site anchor positions |
| B Site | Bombsite | Secondary objective |
| Double | Entry Route | B Site double-door entry |
| Window | Elevated Sightline | B Site overview position |
| Dark | Close Angle | Post-plant defense |
| Bottom Ramp | Transition Zone | Lower Ramp depth marker |
Conclusion:
- Nuke is a map that rewards investment more than almost any other in the CS2 pool. Teams that commit to learning its two-floor structure and communicating with precision consistently outperform those relying on mechanical skill alone. Having all cs2 nuke callouts explained and memorized is the first step toward genuine map competence.
- Control Outside Early Outside dictates the pace of nearly every round. Securing Red and applying pressure toward Secret early forces CTs into reactive positioning before a site is even targeted.
- Communicate Vertical Rotations Telling teammates “rotating from Upper to B via Ramp and Hell” is the difference between a coordinated retake and a staggered, failed one. Floor-level clarity in every call is non-negotiable.
- Memorize Lower Site Angles Dark, Single, Double, and Window create a defensive grid that requires pre-existing positional knowledge to navigate. Memorize these before your first ranked Nuke round.
- Study Pro Call Patterns Professional Nuke matches are among the most callout-dense in CS2. Watching and listening to pro team communications on this map accelerates positional vocabulary faster than solo ranked play alone.
Also Check:
- Donk CS2 Settings
- All CS2 Vertigo Callouts Explained
- When Does the New Siege Season Come Out
- What Are CS2 Skins
- Best CS2 Skins Under $10