Ancient is one of the most tactically complex maps in the current CS2 map pool.
While newer players tend to gravitate toward familiar maps, understanding all CS2 ancient callouts explained is essential for anyone serious about climbing the ranked ladder.
Ancient CS2 rewards teams that communicate clearly and rotate efficiently. Without precise callout knowledge, even mechanically skilled players can fall apart in high-pressure rounds.
This guide breaks down every named location on the map, explains its tactical role, and helps you use the right terminology the moment it matters most.
All CS2 Ancient Callouts Explained
All CS2 Ancient Callouts Explained
- Callouts are the backbone of team communication in CS2. In ranked and Premier modes, the difference between a won round and a lost one often comes down to how fast your team relays position information.
- Pro players rely on precise, consistent callout language to coordinate site takes, mid control fights, and defensive rotations. A single miscommunication in a clutch scenario can cost a round or even a match.
- Communities like All cs2 ancient callouts explained reddit have long debated the most efficient callout vocabulary for Ancient. These threads highlight how different player groups develop slightly varied terminology, making standardized guides more valuable.
- Compared to CS2 Inferno callouts, Ancient’s layout introduces more vertical play and enclosed structures, which makes positional terminology even more critical to master.
- The Ancient callouts CS2 eu meta also reflects regional differences. European teams tend to prioritize mid control and Donut splits more aggressively than other regional playstyles, influencing how callouts are prioritized in comms.
- CS2 Ancient callouts Reddit threads frequently point out that many players underestimate how much the B side cave system and A Temple callouts differ from other maps in the pool.
| Category | Purpose | Importance Level |
|---|---|---|
| Spawn Areas | Starting control & rotations | High |
| Mid Control | Map dominance & rotations | Very High |
| A Site | Primary plant zone | Critical |
| B Site | Secondary plant zone | Critical |
Ancient CS2 Callouts Guide
- Why Ancient Feels Difficult Ancient callouts CS2 players need to learn span both vertical and horizontal space, unlike many other maps. The combination of cave systems, temple structures, and open mid zones creates a learning curve that takes several sessions to overcome.
- Mid Control Importance Mid on Ancient is one of the most contested zones in any round. Whichever side secures Heaven and Xbox control early gains rotation advantages that affect both bombsites simultaneously.
- Common Mistakes New Players Make New players frequently confuse Cheetah and Cave, or fail to distinguish between Long and Short on B Site. These errors in voice communication lead to misread rotations and avoidable deaths.
- How CS2 Ancient Smokes Change Execution CS2 Ancient smokes are deeply tied to callout knowledge. Knowing which area to smoke requires knowing the name first — players who call “smoke Donut” or “smoke Lane” can only execute reliably when everyone understands those locations.
- Comparison With Other Maps Unlike Anubis callouts CS2 players use, Ancient’s callout system involves more enclosed named zones such as Temple, Cave, and House, which require more precise spatial awareness from every player on the roster.
| Zone | CT Advantage | T Advantage |
|---|---|---|
| Mid | Heaven vision control | Donut split pressure |
| A Site | Temple defense | Boost & A Main executes |
| B Site | Pillar anchoring | Cave & Ramp entry |
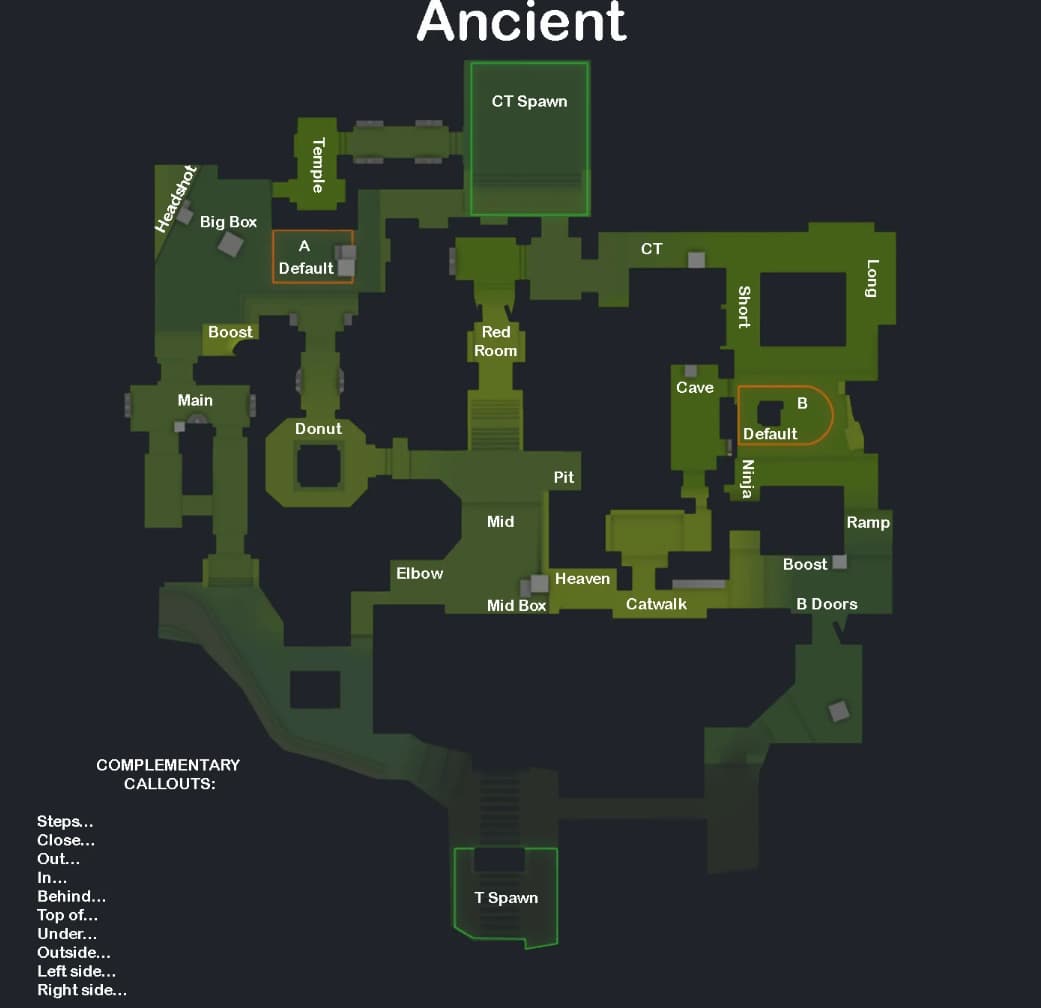
CS2 Ancient Callouts List (2026)
- CT Spawn The area where Counter-Terrorists begin each round. It serves as the central hub for defensive rotations to both A Site via Lane and B Site via Short. CTs frequently reference this area when falling back under pressure.
- T Spawn The starting zone for the Terrorist side at the top of each round. It branches into multiple approach routes including Tunnel, Water, and the path toward Mid. Round strategies typically begin with a call from T Spawn.
- Tunnel A long, enclosed tunnel filled with knee-deep water located to the right of T Spawn. It connects the T side to the Water area and is often used as a quiet initial movement path early in rounds.
- Water A small water-submerged area just beyond Tunnel. It acts as a transitional zone between Tunnel and Ruins. Players call out Water to signal position before committing to a deeper approach.
- Ruins A small enclosed area filled with boxes, positioned between Double Doors and Water. It provides limited cover but serves as a staging point for players looking to move toward the B side without being fully exposed.
- Double Doors A set of double doors that leads toward Ramp on the B side of the map. This chokepoint is a key reference in early-round calls and is frequently the first contested area when Ts push B.
- T Lower The lower area just before Ramp, below the Catwalk elevation. It is used as a positioning callout to distinguish between players taking the ground route versus the elevated path toward B Site.
- Ramp The ramp that leads up directly to B Site. It is one of the primary entry angles for Terrorist executes onto B and is heavily contested during site takes. “Ramp clear” is a common voice call before committing.
- Catwalk A small elevated walkway positioned just before Cheetah and Heaven. It provides a transitional path for Ts moving between B approach angles and is often mentioned alongside Heaven control calls.
- Heaven An elevated platform that overlooks Mid and the Xbox cover below. Heaven control gives CTs and Ts alike strong sightlines across the center of the map, making it one of the highest-value positions in the game.
- Cheetah The T-side entry of the B cave system. When players call “Cheetah,” they are indicating a position at the T-facing entrance of the cave corridor connecting the B approach to the site. It pairs closely with Cave in comms.
- Cave The CT-side portion of the cave on B. CTs often hold Cave to contest B entries early. Distinguishing between Cheetah and Cave prevents critical rotation errors during live rounds.
- B Site The main plantable zone on the B side of the map. It is the secondary bomb objective and features tight angles, pillar cover, and multiple entry points from Long, Short, and the cave system.
- Pillar A large pillar positioned directly in the center of B Site. It is the primary defensive anchor for CT players holding the site and is constantly referenced in post-plant and retake scenarios.
- Long The B Site entry furthest from CT Spawn. Long provides a wider angle approach but requires more map control to use safely. It is frequently referenced when Ts are pushing a full B execute.
- Short The B Site entry closest to CT Spawn. Short allows CTs to contest B quickly or Ts to catch rotations off-guard. It is a key callout in both defense and aggressive B pushes.
- Alley A short walkway connecting Long and Short on the B side. Alley is used as a positional callout when players are caught between the two main B entries or holding a crossfire position.
- House A small room located directly in front of CT Spawn. It is used as a positional anchor for CT-side players and is referenced when a player is holding an early angle or retreating toward spawn.
- Red A small elevated room on the CT side at the top of Mid. Red provides strong sightlines down into the Mid area and is a key defensive position early in rounds, especially for AWP holders.
- Mid The main open central area of Ancient. Mid is the most strategically significant zone on the map, connecting T Spawn routes to both A and B sides. Control of Mid directly impacts round outcomes.
- Xbox A small cluster of boxes located just beneath Heaven in Mid. Xbox provides cover for players crossing mid and is frequently called out when a player is holding or being spotted in that position.
- Elbow The entrance to Mid from the Split area, shaped like an elbow. It is a common chokepoint at the start of rounds and is regularly mentioned in early-round peeks and CT-side aggression calls.
- Donut A small circular cave connecting Mid to the A side of the map, named for its rounded shape. Donut is a critical rotation path and is central to T-side mid-to-A split strategies.
- Split A large pillar located just outside the Elbow entrance. Split provides cover for players moving from Mid toward the A side and is referenced in calls about positioning during mid-round transitions.
- A Stairs A small set of stairs that leads up to A Main. A Stairs is called out to signal movement approaching A Main from below and helps teammates track how far along an approach a player is.
- A Halls Two hallways located inside A Main. A Halls narrows the approach to A Site and is a key area for utility usage and pre-aim discipline before committing to a site execute.
- A Main The primary entrance point to A Site from the T side. A Main is heavily contested and is the central focus of most A-side executes. Nearly every A-take strategy includes A Main in the callout sequence.
- Boost An elevated area to the right of A Main where players can be boosted by teammates. Boost spots allow players to gain unexpected sightlines into A Main, catching defenders off-guard during executes.
- Big Box A large box near A Site and outside Temple with direct sightlines into A Main. Big Box is used as a defensive anchor by CTs and is called out when players are holding aggressive angles toward the incoming T push.
- Plat A small elevated platform next to Big Box, featuring its own smaller cover box. Plat is used for positioning in both offense and defense and is often paired with Big Box in the same callout sequence.
- A Site The main plantable area on the A side of the map. A Site is the primary bomb objective and features multiple named positions including Triple, Temple, and Lane that require individual callout knowledge.
- Triple A set of boxes located on A Site. Triple provides plant cover and is a common position referenced in post-plant holds and retake scenarios. Players calling out Triple help teammates identify exact bomb location.
- Temple A large enclosed temple structure at the back of A Site. Temple is one of the most defensively powerful positions on the map and is frequently held by CTs anchoring the site against late rotations.
- Lane The main lane running parallel to Temple, used by CTs to enter A Site from spawn. Lane is referenced in rotation calls and is a critical sightline in retake scenarios when CTs push back through the site.
| Callout | Area Type | Strategic Role |
|---|---|---|
| CT Spawn | Spawn | Defensive rotations |
| T Spawn | Spawn | Round start positioning |
| Tunnel | Entry Route | Early T-side movement |
| Water | Transition Zone | B-side approach staging |
| Ruins | Cover Area | Pre-Double Doors positioning |
| Double Doors | Chokepoint | B-side entry control |
| T Lower | Elevation Reference | Ramp approach depth |
| Ramp | Entry Route | Primary B execute path |
| Catwalk | Elevated Walkway | B-side height transition |
| Heaven | Elevated Platform | Mid vision & control |
| Cheetah | Cave Entry (T-side) | B cave approach |
| Cave | Cave Entry (CT-side) | B early defense |
| B Site | Bombsite | Secondary objective |
| Pillar | Defensive Anchor | B site center control |
| Long | Entry Route | Far B approach |
| Short | Entry Route | Close B approach |
| Alley | Connector | Long to Short link |
| House | Cover Room | CT spawn defense |
| Red | Elevated Position | Mid sightline control |
| Mid | Control Zone | Map dominance |
| Xbox | Cover Cluster | Mid crossing safety |
| Elbow | Chokepoint | Mid entry from Split |
| Donut | Connector | Mid to A split |
| Split | Cover Pillar | Mid to A transition |
| A Stairs | Approach Path | A Main depth tracking |
| A Halls | Hallway | Pre-site utility zone |
| A Main | Entry Route | Primary A execute path |
| Boost | Elevated Area | A Main surprise angle |
| Big Box | Defensive Cover | A Main sightline hold |
| Plat | Elevated Platform | A site anchor position |
| A Site | Bombsite | Primary objective |
| Triple | Box Cluster | Post-plant cover |
| Temple | Defensive Anchor | Back site control |
| Lane | CT Entry Lane | Retake & rotation path |
Conclusion:
- Mastering all cs2 ancient callouts explained in this guide gives you a direct competitive advantage, whether you are pushing for Global Elite or holding your rank in Premier. Ancient rewards teams who communicate with precision and rotate without hesitation.
- Master Mid First Mid control on Ancient cascades into advantages on both sites. Securing Heaven and Xbox early forces opponents into reactive positions.
- Memorize Site Anchors Temple on A and Pillar on B are the two most referenced defensive positions. Knowing them by name speeds up every retake call.
- Use Proper Utility CS2 Ancient smokes are only effective when the team knows exactly which callout is being covered. Pair smoke calls with precise location names for clean, coordinated executes every round.